Setup Environments, Create Django project
Have you wanted to try Django but felt intimidated by the setup process? Don't worry, I got you. In this Blog, I break down exactly how to set up your environment and get a new Django project up and running smoothly. Follow along and you'll be coding in no time. This Blog is all about getting started with Django. Perfect for anyone who's a beginner and looking for a clear, step-by-step tutorial.
The Roadmap to Your First Project, Let's Get Started!
In this comprehensive guide, we'll walk you through the entire process of setting up a new Django project from scratch. We'll begin by getting your development environment ready, which includes installing a code editor and the necessary Python libraries. Next, we'll cover the core steps of creating a virtual environment, spinning up a new Django project and app, and configuring them to work together. Finally, we'll create a basic web page and test it by running the Django development server, giving you a solid foundation to start building your own web applications.
1. Setting Up Your Environment
Before we start coding, we need to make sure our machine is ready.
First, install Python. The latest version of Python comes with a code interpreter that allows you to run your Python code. Make sure you get the official installer from the Python website.
Once installation completed follow below step environment
- Press Win + R, type sysdm.cpl, and hit Enter.
- Go to the Advanced tab → Click Environment Variables.
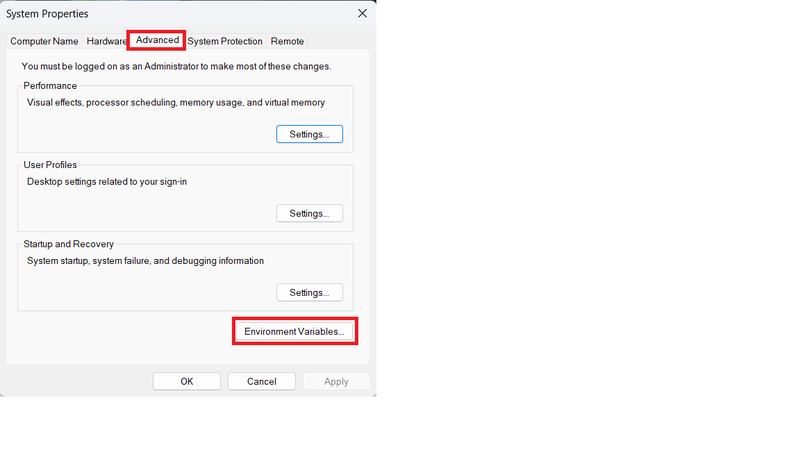
- Under User variables or System variables, click path line.
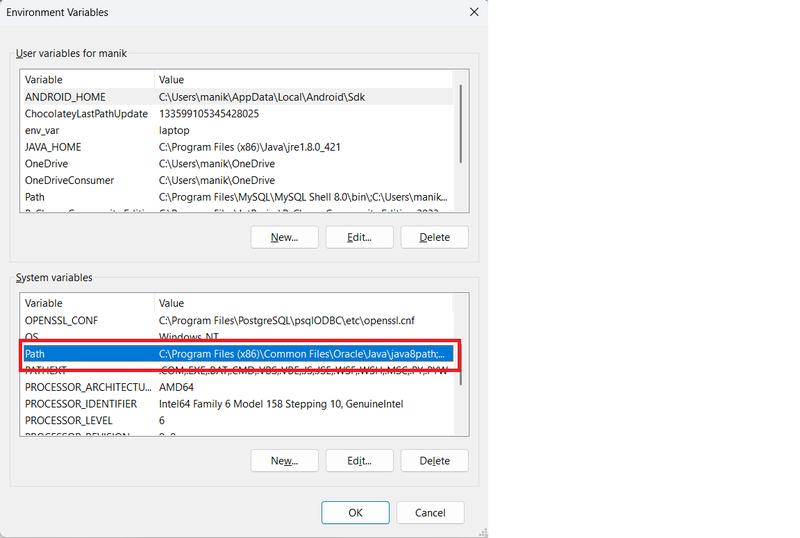
- Click on New button and add python script path and python folder path.
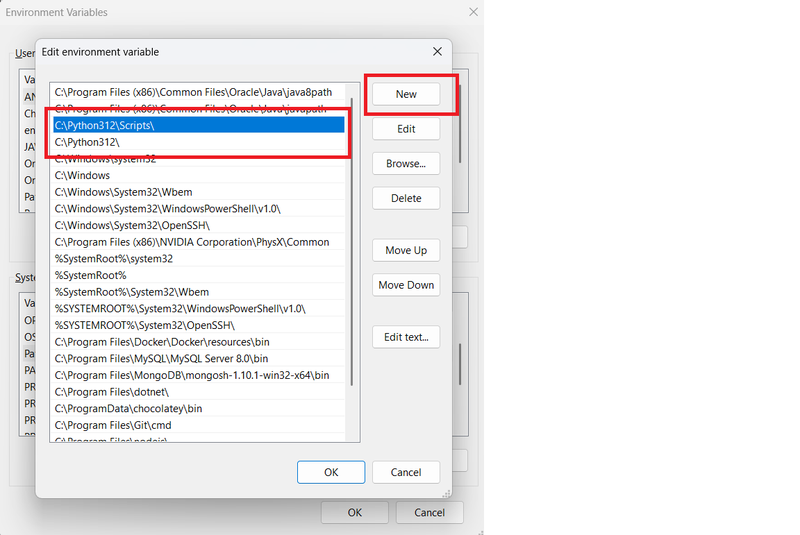
- Click on all ok button and finally click on apply button.
- Press Win + R, type cmd, and hit Enter.
- Type python and hit enter. If python interpreter works fine then python properly set on your machine.

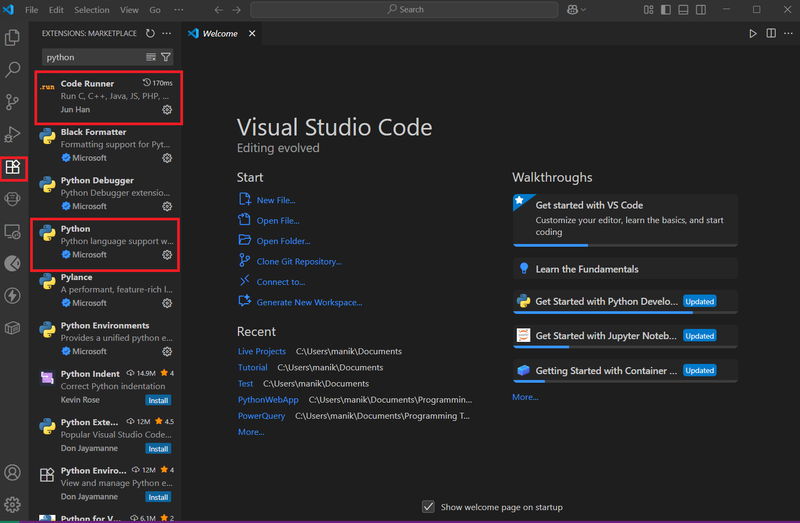
Next, you need a good code editor. While many options are available, VS Code is a popular choice for its flexibility and powerful features. Install it and add the necessary extensions like the official Python extension. This will give you features like code highlighting, linting, and a built-in terminal, making your life much easier.
Once installation completed, add vs code extensions.
- Click on extension icon on vs code, Type python search bar and install Code Runner, Python extensions.
2. Creating a Virtual Environment
This is a crucial step! A virtual environment creates an isolated space for your project. This means any libraries or packages you install for this project won't interfere with your other Python projects.
In your terminal or command prompt, navigate to the folder where you want to create your project and run the following command:
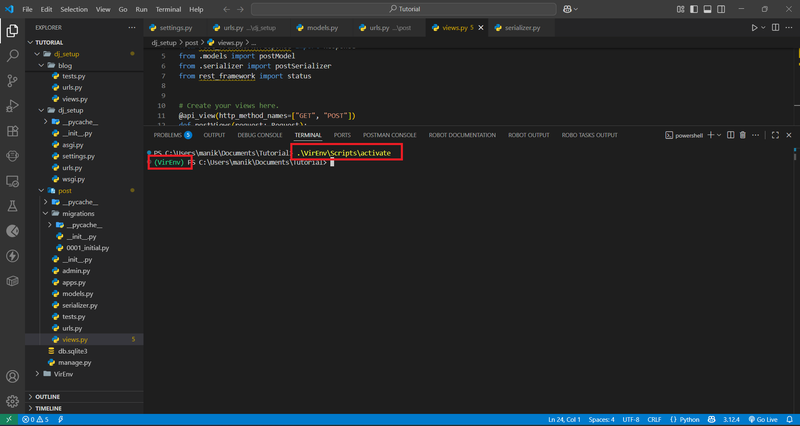
python -m venv VirEnvAfter the command runs, a new folder named VirEnv will appear. Now, activate the environment.
On macOS/Linux:
source VirEnv/bin/activateOn Windows:
VirEnv\Scripts\activateYou'll know it worked when you see the virtual environment's name in parentheses in your terminal.
3. Installing Django and Starting Your Project
With your virtual environment activated, it's time to install Django.
pip install DjangoNow, let's create your first Django project. Run this command:
django-admin startproject my_project .The . at the end is important—it tells Django to create the project files in the current directory, keeping your project folder clean.
Next, create your first app. Django projects are made up of reusable apps. For example, if you were building a blog, you might have an app for posts and another for comments.
python manage.py startapp my_appThis creates a new folder called my_app with a standard set of files.
4. Linking Your App and Configuring URLs
To make your new app work, you need to connect it to your main project.
Open the settings.py file inside your my_project folder. Find the INSTALLED_APPS list and add your new app's name:
INSTALLED_APPS = [
    'django.contrib.admin',
    'django.contrib.auth',
    'django.contrib.contenttypes',
    'django.contrib.sessions',
    'django.contrib.messages',
    'django.contrib.staticfiles',
    'my_app', # Add your app here
]Next, you need to configure the main urls.py file to route traffic to your app.
In the my_project/urls.py file, add your app's URLs.
from django.contrib import admin
from django.urls import path, include

urlpatterns = [
    path('admin/', admin.site.urls),
    path('', include('my_app.urls')), # Link to your app's URLs
]Now, create a new file named urls.py inside your my_app folder to define the paths for your app.
from django.urls import path
from . import views

urlpatterns = [
    path('home/', views.home_page, name='home_page'),
]5. Creating a View and Template
A view is a Python function that handles a web request and returns a response. A template is an HTML file that renders the web page.
In your my_app/views.py file, create a simple home view:
from django.shortcuts import render


# Create your views here.
def home_page(request):
    name = {"name": "Your Name"}
return render(request, "home.html", context=name)Now, create the template. Inside your my_app folder, create a new directory called templates, and inside that, create a new HTML file called home.html.
<!DOCTYPE html>
<html lang="en">

<head>
    <meta charset="UTF-8">
    <meta name="viewport" content="width=device-width, initial-scale=1.0">
    <title>Document</title>
</head>

<body>
    <h1>Welcome to blog page</h1>
    <p>{{name}}</p>
</body>

</html>6. Running the Server
You've done it! The final step is to run your development server and see your work. In your terminal, make sure you are in the project's root directory (where manage.py is located) and run this command:
python manage.py runserverOpen your web browser and go to http://127.0.0.1:8000/home/. You should see your "Welcome to blog page" message and below your name.
Congratulations! You've successfully set up your environment, created a Django project and app, and run a server. This is the foundation for all the amazing projects you'll build with Django.
Do You Need Side Income? <<<<<<<<<<<<<<
Get Paid to Share Your Opinion: User Interviews Can Get You Quick Cash
Ever heard of User Interviews? It's a platform that pays you for your feedback on products and services. The best part is that you can get a bonus just for signing up and completing your first study. I've already earned money with them, and you can, too.
Click here to sign up and get your bonus! Please wait until Sign Up page load.
Disclaimer: Referral bonus amounts are subject to change. The bonus is awarded after you complete your first paid study and may take a few days to process. All terms and conditions are set by User Interviews, and it's best to check their official site for the most up-to-date program rules.
Earn Cash for Your Opinions and a Bonus to Boot: Try Respondent.io
Respondent is a top platform that pays you for taking part in market research and user interviews. I've used it to find great paid studies, and you can, too. Their referral program is a fantastic way to earn more: when a friend you refer signs up and completes a study, you both get a bonus. It’s a great way to earn a little extra for yourself while helping a friend find paid work.
Click here to sign up and get your bonus!
Disclaimer: Referral bonus amounts and terms are subject to change by Respondent.io. The bonus is typically awarded after the referred friend completes their first paid study. Please check their official referral program page for the most up-to-date details.