Configure Simple JWT with Django Rest Framework DRF
Tired of complex auth setups? This quick guide shows you how to integrate Simple JWT with Django REST Framework for fast, secure token authentication. We cover everything from installation to getting your first authenticated endpoint up and running. Perfect for developers who want to keep things, well, simple.

Mastering API Authentication: A Simple Guide to Simple JWT with Django REST Framework
Building a secure and scalable API is crucial for any modern web application. And when it comes to authentication, you need a solution that is both robust and easy to implement. Enter Simple JWT, a lightweight and powerful library for Django REST Framework that makes token-based authentication a breeze.
In this guide, we'll walk you through the essential steps of securing your DRF API using Simple JWT, covering everything from initial setup to handling token refresh and permissions.
Step 1: Understanding Simple JWT
Before we dive into the code, let's quickly understand what makes Simple JWT so great. It's a library that leverages JSON Web Tokens (JWTs) to handle authentication. Unlike traditional session-based authentication, JWTs are self-contained. They hold information about the user and are cryptographically signed, making them perfect for stateless APIs. Simple JWT simplifies the entire process, providing a clean and efficient way to create, verify, and renew these tokens.
Here's how it generally works:
- Token Generation: When a user successfully logs in with their credentials (like username and password), Simple JWT generates a pair of tokens: an access token and a refresh token.
- Access Token: The access token is a short-lived token that is used to authenticate subsequent requests to protected API endpoints. It contains claims (data) about the user, such as their ID, and is signed by the server's secret key.
- Refresh Token: The refresh token is a longer-lived token used to obtain a new access token once the old one expires. This system enhances security by limiting the time a single access token is valid, reducing the risk if it's intercepted.
- Authentication Flow: The client sends the access token in the Authorization header with each API request. Simple JWT's authentication backend verifies the token's signature and expiration, granting or denying access to the requested resource.
Key Advantages:
I. Statelessness and Scalability
Unlike session-based authentication, which stores user session data on the server, JWTs are stateless. The token itself contains all the necessary user information and is signed by a secret key. The server only needs to verify the token's signature on each request, without having to query a database. This is a huge advantage for:
- Distributed Systems: You can have multiple API servers running in a load-balanced environment, and any server can authenticate a request without needing a shared session store.
- Performance: Since there's no database lookup on every single authenticated request, it reduces the load on your database and improves API response times.
II. Enhanced Security
DRF Simple JWT is designed with security in mind, addressing some of the weaknesses of older methods.
- Short-Lived Access Tokens: The plugin uses a pair of tokens: a short-lived access token for API requests and a longer-lived refresh token to get a new access token. If an access token is compromised, the attacker has a very small window of time to use it.
- Token Blacklisting: Simple JWT supports a token blacklist system, which allows you to revoke or invalidate tokens before they expire. This is crucial for handling events like a user changing their password or logging out from all devices.
- Tamper-Proof Data: The claims in a JWT are digitally signed. The server can immediately detect if any of the data within the token has been altered, preventing a malicious user from changing their user ID or permissions.
III. Client-Side Benefits
JWTs are not just beneficial for the backend; they also provide advantages for front-end development.
- Self-Contained Data: A JWT can hold essential, non-sensitive user information (like a user ID or role) in its payload. This allows the client-side application to access this data immediately upon receiving the token, without making an additional API call to get user details.
- Cross-Platform Compatibility: Since JWTs are a standardized format, they work seamlessly with various client applications, whether it's a web app built with React or a mobile app.
Step 2: Installation and Configuration
- The first step is to get the library into your project. Open your terminal and run the following command:
pip install djangorestframework-simplejwt- Next, you need to configure your Django project to use Simple JWT. Head over to your settings.py file and make the following changes:
# settings.py

REST_FRAMEWORK = {
    'DEFAULT_AUTHENTICATION_CLASSES': (
        'rest_framework_simplejwt.authentication.JWTAuthentication',
    )
}This tells Django REST Framework to use JWTAuthentication as the default authentication class for all your API views.
- Next, you need to add the following code to your urls.py file to include the necessary routes urls for Simple JWT.
#my_project/urls.py

from rest_framework_simplejwt.views import (
    TokenObtainPairView,
    TokenRefreshView,
)

urlpatterns = [
    ...
    # This is for create access token by providing login credentials.
    path('api/token/', TokenObtainPairView.as_view(), name='token_obtain_pair'),
    # This is for regenerate access token by providing refresh token.
    path('api/token/refresh/', TokenRefreshView.as_view(), name='token_refresh'),
    ...
]- The TokenVerifyView is used to verify the validity of an access token without needing to access the secret signing key. This is particularly useful for stateless APIs where you don't want to hit the database to check if a token is valid.
To add this functionality to your project, you'll need to include the route for TokenVerifyView in your urls.py file. This adds an endpoint that allows a client to send an access token and get a simple "OK" or an error response, which tells them if the token is valid or expired.
#my_project/urls.py
from django.urls import path
from rest_framework_simplejwt.views import (
    TokenVerifyView,
)

urlpatterns = [
    # This for verify the access token with stateless APIs
    path('api/token/verify/', TokenVerifyView.as_view(), name='token_verify'),
    # ... your other URL patterns
]- Next, If you want to use localizations or translations for the Simple JWT messages, you must add 'rest_framework_simplejwt' to your INSTALLED_APPS setting. This allows Django to discover and use the translation files that are included with the library.
#my_project/settings.py

INSTALLED_APPS = [
    'django.contrib.admin',
    'django.contrib.auth',
    'django.contrib.contenttypes',
    'django.contrib.sessions',
    'django.contrib.messages',
    'django.contrib.staticfiles',
    'rest_framework',
    'rest_framework_simplejwt',  # Add this line
    # ... your other apps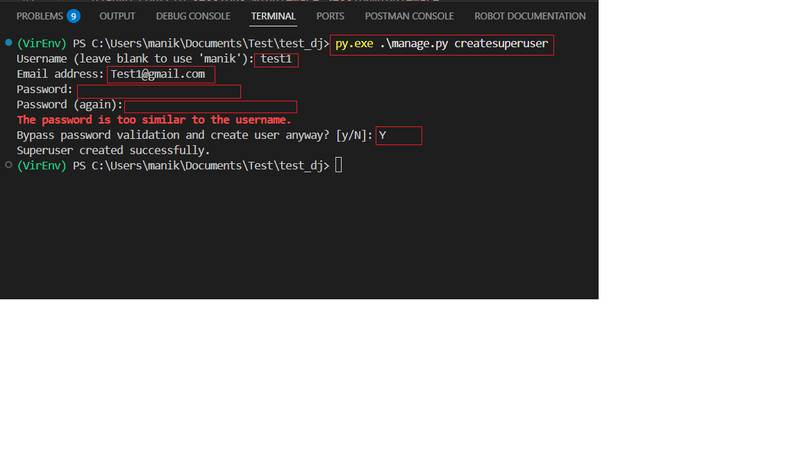
]Step 3: Create a Superuser for Testing
To test our authentication flow, we'll need a user account. If you don't have one, create a superuser from your terminal:
python manage.py createsuperuserFollow the prompts to set up a username, email, and password. This account will be our test subject for the rest of the tutorial.
Step 4: Generating Access and Refresh Token.
Now for the fun part! Simple JWT provides a built-in endpoint to get a token. We'll use a tool like Postman or a simple curl command to test it.
Now, send a POST request to http://127.0.0.1:8000/api/token/ with a JSON body containing your superuser's username and password.
Request:
If you are using browsable API, Please refer below image.
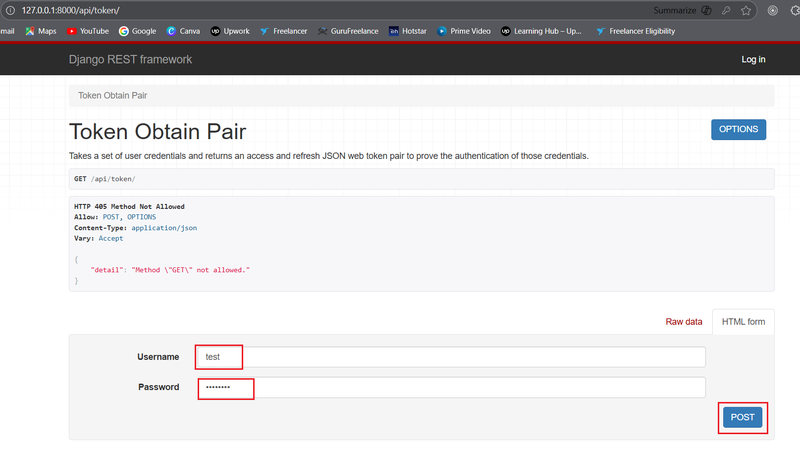
If you are using API testing tool, set method as POST , paste above mention url, with a JSON body containing your superuser's username and password as below.
{
    "username": "your_username",
    "password": "your_password"
}Response:
You should receive a response containing an access token and a refresh token.
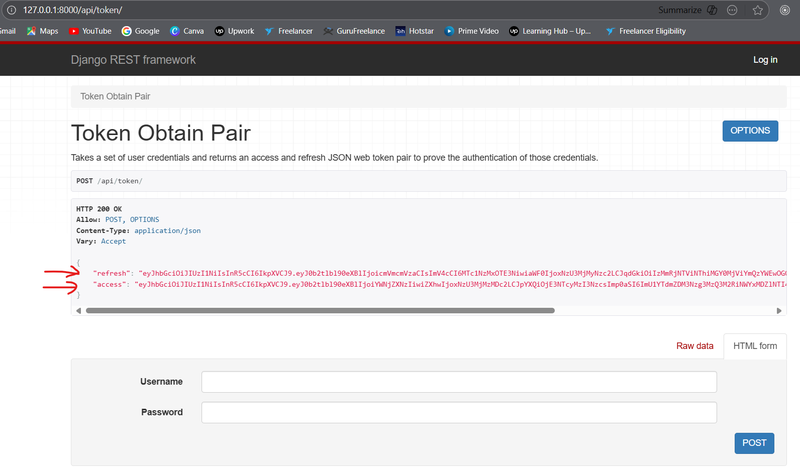
If you are using API testing tool, then response containing an access token and a refresh tokenas below.
{
    "refresh": "eyJ0eXAi...",
    "access": "eyJ0eXAi..."
}Step 5: Verifying Access Token Stateless APIs
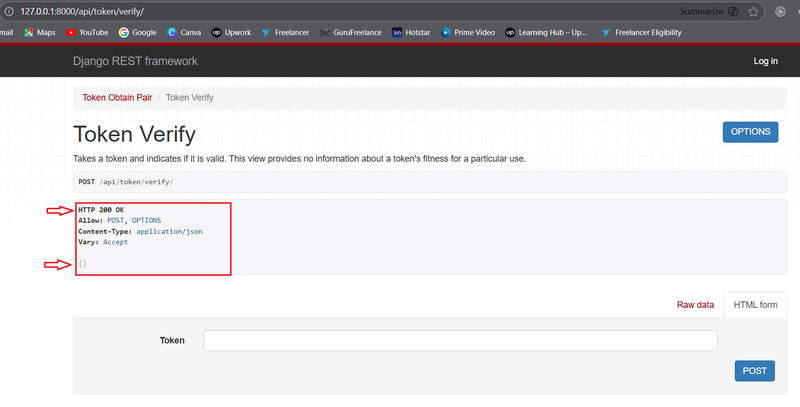
The access token is what you'll use to authenticate with protected API endpoints. To verify it works, create a simple protected view.
To verify an access token, you'll send a POST request to the api/token/verify/ endpoint. The access token is included in the request body as JSON.
Request
The request should be a POST to the URL http://127.0.0.1:8000/api/token/verify
If you are using browsable API, Please refer below image.
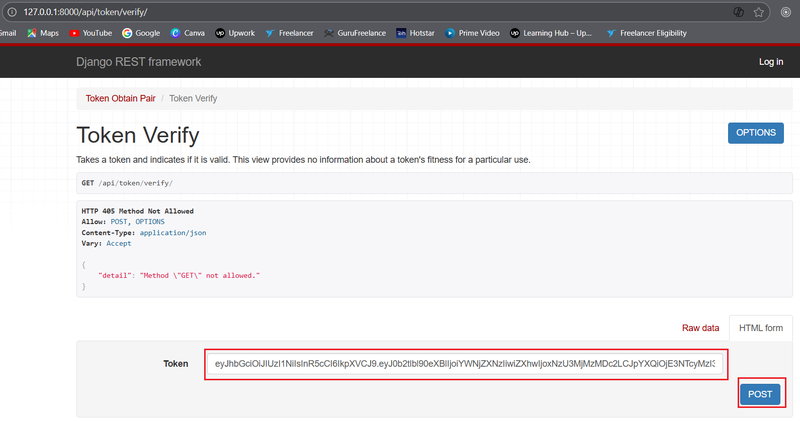
If you are using API testing tool, set method as POST , paste above mention url, the request body should contain the access token in a JSON format like this:
{
    "token": "... Replace Your access token here something like this eyJ0eXAiOiJKV1QiLCJhbGciOiJIUzI1NiJ9..."
}Replace the placeholder with the actual access token you want to verify.
Response
If the token is valid and not expired, you will receive an HTTP 200 OK response with an empty JSON object {}.
If the token is invalid or expired, you will receive an error response, such as HTTP 401 Unauthorized, with a message indicating the reason for the failure.
If successful, you'll get the "Hello, authenticated user!" message. If you try to access it without the token, you'll get an "Authentication credentials were not provided" error.
Step 6: Renewing the Access Token with Refresh Token
Access tokens have a short lifespan for security reasons. When an access token expires, you can use the long-lived refresh token to get a new one without forcing the user to log in again.
Send a POST request to http://127.0.0.1:8000/api/token/refresh/ with the refresh token you received earlier.
Request:
If you are using browsable API, Please refer below image.
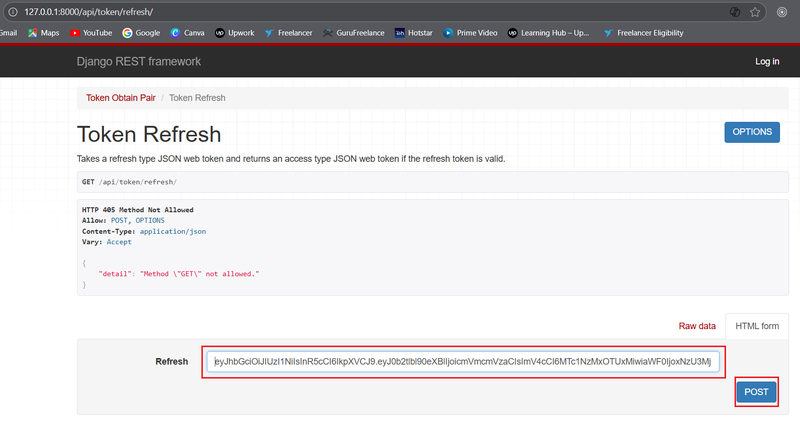
If you are using API testing tool, set method as POST , paste above mention url, request body should contain the refresh token you received earlier in a JSON format like this:
{
    "refresh": "... Replace Your refresh token here something like this eyJ0eXAi..."
}Response:
If you are using browsable API, Please refer below image.
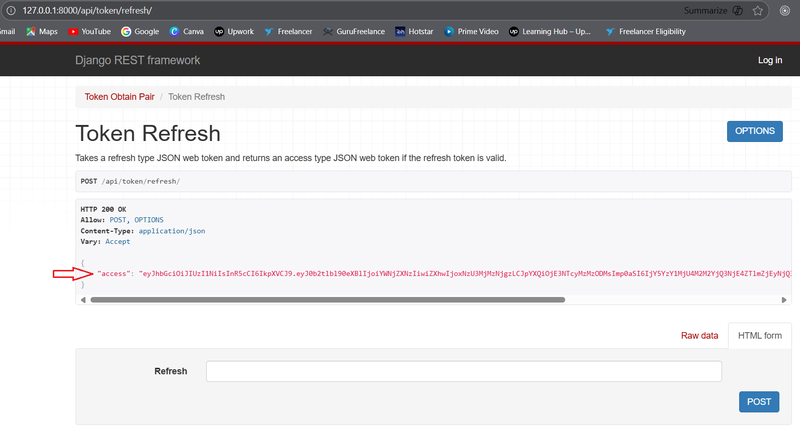
If you are using API testing tool, The request body should contain the access token in a JSON format like this:
{
    "access": "eyJ0eXAi..."
}This returns a new access token, allowing the user to continue their session seamlessly.
Step 7: Adding Permissions for a View
To demonstrate how permissions work in function-based views, you'll need to create two separate views: one that is publicly accessible and one that requires authentication.
I. URL Setup for API Endpoints
First, let's set up the URLs for our two new function-based views in your urls.py file. This is where we'll map the view functions to specific API endpoints.
# my_project/urls.py
from django.urls import path
from rest_framework_simplejwt.views import (
    TokenObtainPairView,
    TokenRefreshView,
)

from .views import public_view, protected_view # Assuming these views are in a views.py in the same app

urlpatterns = [
    # Simple JWT token URLs  Already added in Step 2
    path('api/token/', TokenObtainPairView.as_view(), name='token_obtain_pair'),
    path('api/token/refresh/', TokenRefreshView.as_view(), name='token_refresh'),

    # Our new function-based view URLs
    path('api/public/', public_view, name='public_view'),
    path('api/protected/', protected_view, name='protected_view'),
]II. Creating the View Functions
Now, create the two view functions in your views.py file. We'll use the @api_view decorator from Django REST Framework to make them function-based API views. For the protected view, we'll explicitly add the permission_classes decorator.
# my_project/views.py

from rest_framework.decorators import api_view, permission_classes
from rest_framework.permissions import IsAuthenticated, AllowAny
from rest_framework.response import Response

@api_view(['GET'])
@permission_classes([AllowAny])
def public_view(request):
    """
    This endpoint is public and does not require any authentication.
    """
    return Response({"message": "Hello from a public endpoint!"})

@api_view(['GET'])
@permission_classes([IsAuthenticated])
def protected_view(request):
    """
    This endpoint is protected and requires a valid access token.
    """
return Response({"message": f"Hello, {request.user.username}! You are authenticated."})III. Testing the Endpoints with curl
Now you can test these endpoints from your command line using curl.
Just open command prompt for test with curl by press win+r and type cmd, hit enter.
- Test 1: Access the Public Endpoint (No Authentication Needed)
Just open command prompt for test with curl by press win+r and type cmd, hit en
curl -X GET http://127.0.0.1:8000/api/public/Expected Response:
{"message": "Hello from a public endpoint!"}- Test 2: Access the Protected Endpoint (Without Authentication)
This test should fail because you haven't provided a token. You'll receive a 401 Unauthorized error.
curl -X GET http://127.0.0.1:8000/api/protected/Expected Response:
{"detail":"Authentication credentials were not provided."}- Test 3: Access the Protected Endpoint (With Authentication)
First, you need to get a valid access token. Use curl to get one with a POST request to the token endpoint.
curl -X POST http://127.0.0.1:8000/api/token/ -H "Content-Type: application/json" -d '{"username":"your_username", "password":"your_password"}'Copy the access token from the response. Then, use it in the Authorization header to access the protected endpoint.
curl -X GET http://127.0.0.1:8000/api/protected/ -H "Authorization: Bearer YOUR_ACCESS_TOKEN"Expected Response:
{"message": "Hello, your_username! You are authenticated."}Conclusion
By following these steps, you've successfully implemented a robust and scalable token-based authentication system for your Django REST Framework API using Simple JWT. This powerful library gives you the flexibility to manage user sessions securely while keeping your application stateless and performant. Now go ahead and build amazing, secure APIs!
Do You Need Side Income?<<<<<<<<<
Get Paid to Share Your Opinion: User Interviews Can Get You Quick Cash
Ever heard of User Interviews? It's a platform that pays you for your feedback on products and services. The best part is that you can get a bonus just for signing up and completing your first study. I've already earned money with them, and you can, too.
Click here to sign up and get your bonus! Please wait until Sign Up page load.
Disclaimer: Referral bonus amounts are subject to change. The bonus is awarded after you complete your first paid study and may take a few days to process. All terms and conditions are set by User Interviews, and it's best to check their official site for the most up-to-date program rules.
Earn Cash for Your Opinions and a Bonus to Boot: Try Respondent.io
Respondent is a top platform that pays you for taking part in market research and user interviews. I've used it to find great paid studies, and you can, too. Their referral program is a fantastic way to earn more: when a friend you refer signs up and completes a study, you both get a bonus. It’s a great way to earn a little extra for yourself while helping a friend find paid work.
Click here to sign up and get your bonus!
Disclaimer: Referral bonus amounts and terms are subject to change by Respondent.io. The bonus is typically awarded after the referred friend completes their first paid study. Please check their official referral program page for the most up-to-date details.